Homemade dumpling wrappers give you something store-bought packs rarely do: control. You can make them thicker for boiling, thinner at the edges for easier pleating, and soft enough to stay workable from the first dumpling to the last. When the dough is fresh, the wrappers seal better, cook more evenly, and become part of the texture instead of just holding the filling in place.
The practical case for making them from scratch is bigger than nostalgia. The global dumpling wrapper market reached USD 2.26 billion in 2025 and is projected to reach USD 3.84 billion by 2034 at a 6.1% CAGR, which says wrappers sit in a sizable, expanding convenience-food category, not a tiny niche Growth Market Reports. That demand makes sense in home kitchens too, because the right wrapper changes how a dumpling pleats, seals, steams, boils, or crisps.
For anyone who likes cooking as an experience as much as a recipe, a dumpling outing like the Dumpling Trail experience shows how much texture and style can vary even within one food. That same idea applies at home, where the wrapper isn't just packaging, it's part of the dish.
Table of Contents
- Why Homemade Dumpling Wrappers Beat the Store-Bought Box
- Choosing the Right Dough Formula for Your Style
- Mixing, Kneading, and Resting for a Pliable Dough
- Rolling and Cutting Wrappers to the Right Thickness
- Matching Wrapper Thickness to Cooking Method
- Storing, Refrigerating, and Freezing Wrappers Properly
- Troubleshooting the Three Most Common Wrapper Problems
Why Homemade Dumpling Wrappers Beat the Store-Bought Box
The first time I swapped store-bought skins for fresh ones on a weeknight, the difference showed up right away. The homemade batch stayed soft at the edges while I worked, and the pleats held instead of splitting open halfway through sealing. The filled dumplings also ate more cleanly, because the wrapper had enough structure to support the filling without turning tough.
More control, less improvising
Store-bought wrappers can work, but they leave you stuck with whatever thickness, flour blend, and dryness level came out of the package. Homemade wrappers let you adjust all three. Roll them a little thicker if the dumplings will be boiled. Leave the rim thinner if you want a cleaner pleat and a more delicate bite.
That control matters because the wrapper does real work. It affects how much steam reaches the filling, how well the seam stays closed, and how much chew you get after cooking. It also changes the edge texture after cooking, which is where a lot of weak wrappers fall apart first. A skin that behaves well for steaming can feel dense in a pan, and a wrapper that looks fine on the board can split once it hits boiling water.
Practical rule: match the wrapper to the final bite, not just the filling. A stronger dough helps keep seams intact in boiling or pan-frying, while a lighter wrapper gives steamed dumplings a softer edge.
A lot of cooks assume homemade means fussy. It does not. The ingredient list stays short, the dough is easy to mix, and the rest period is predictable. If you can mix dough, let it rest, and roll small rounds, you are already most of the way there.
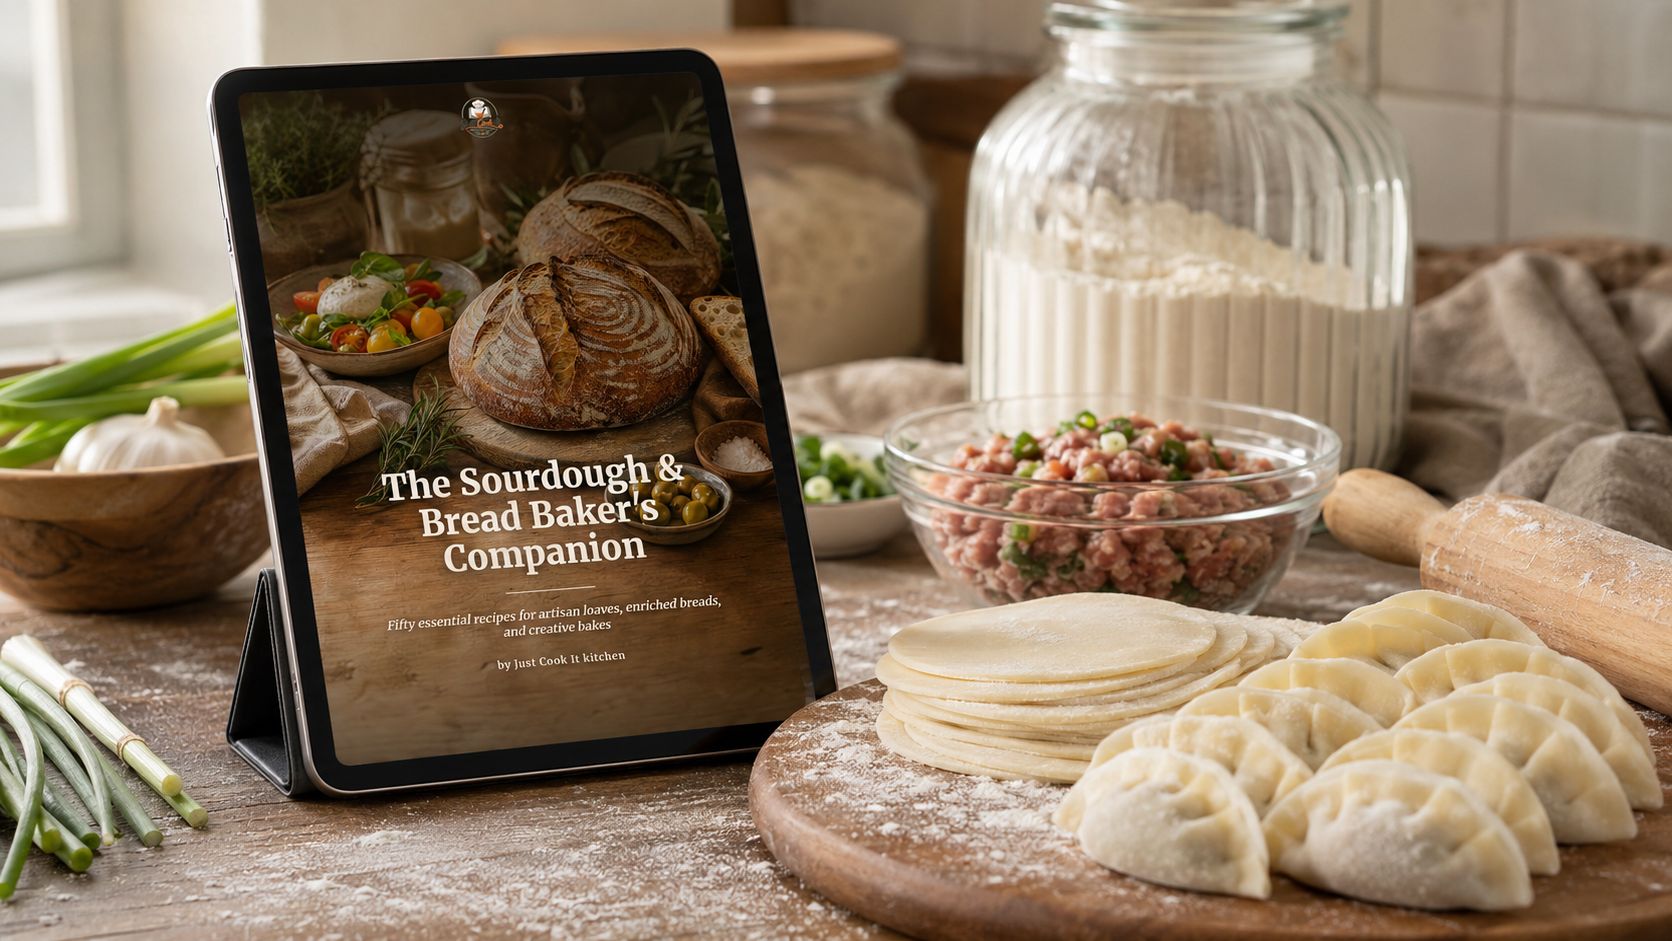
For cooks who like comparing dough systems, a baking reference such as The Sourdough & Bread Baker's Companion is a useful reminder that flour, water, salt, and time carry most of the work when you understand how dough behaves. Dumpling dough is simpler than bread dough, but the same idea applies. Small changes in hydration and handling produce very different results.
What to expect on time and effort
The basic dough pattern fits a weeknight. A common formula uses 2 cups of flour, 2/3 cup of hot water, and 1/2 teaspoon of salt, then rests for 30 minutes to 1 hour before rolling Korean Bapsang. Some cooks knead longer by hand to get a smoother dough, then let it rest until it relaxes enough to roll without springing back. That extra time usually pays off in wrappers that stretch more cleanly and seal with less resistance.
That is enough time to make the wrappers and still finish dinner without rushing the rest of the meal. It also gives you a chance to adjust thickness before you commit to the whole batch, which matters more than people expect once the dumplings start cooking. If you have ever watched a wrapper tear at the fold or go leathery on the edge, the fix usually starts with the dough, not the filling.
If you like learning by comparing dough styles in a real kitchen setting, a dumpling outing like the Dumpling Trail experience is a useful reminder that texture choices change the finished bite fast. The same is true at home. A wrapper is not just packaging, it is part of the dish.
Choosing the Right Dough Formula for Your Style
The right dough formula depends on how the dumpling will be cooked, how much stretch you need, and how much chew you want in the bite. A wrapper for boiled jiaozi needs a different balance from one meant for steaming, and a pan-fried dumpling sits somewhere between the two. If the dough is too soft, it can tear while you shape it. If it is too firm, it rolls out grudgingly and seals with more resistance than it should.
Three practical dough formulas
Here's the practical split:
| Formula | Key Ingredients | Hydration Level | Best For |
|---|---|---|---|
| Plain flour and water | Flour, water, salt | Moderate | Boiled dumplings and flexible all-purpose use |
| Hot-water dough | Flour, hot water, salt | Slightly lower feel, softer handling | Steamed dumplings and tender skins |
| Egg-enriched dough | Flour, egg, water, salt | Richer, firmer dough | Specialty wrappers and deeper flavor |
Plain flour-and-water dough gives the widest range of use. It rolls evenly, seals well, and holds up in boiling water without turning delicate fillings into a fight. Hot-water dough behaves differently. The heat partially softens the flour, so the dough feels less elastic and more forgiving on the bench, which helps when you want a wrapper that stays tender after steaming. Egg-enriched dough adds body and a fuller taste, and it makes sense for wrappers that need a little more strength or a richer finish.
Choose based on the final texture you want, not on habit. If you want a wrapper that stretches cleanly and keeps its shape during boiling, plain dough is the safest starting point. If you want softness with less spring-back, hot-water dough is the better fit. If you want a firmer, more substantial wrapper, egg dough gives you that without needing a completely different method.
Short version: choose hot-water dough when you want softness, plain flour-and-water when you want versatility, and egg dough when you want a richer, firmer wrapper.
The same practical thinking applies in other kitchen work too. A useful example is the sausage casing guide for New Zealanders, where the casing has to match the filling, the cooking method, and the texture you expect at the end. Dumpling dough works the same way, just with a tighter handling window and less room to correct mistakes after rolling starts.
Flour choice changes the final feel
All-purpose flour is the most practical starting point. Bread flour gives more chew because of higher protein, while cake flour softens the bite but can make the dough less forgiving. For most home cooks, all-purpose is the safest default because it balances strength and rolling ease.
The key decision is what you want the wrapper to do once it hits heat. If you want resilience, stay on the stronger side. If you want tenderness, use a softer flour and keep the dough hydrated enough to stay pliable. Edge texture matters too, because a wrapper that feels smooth in the center but dries at the rim will seal differently and can crack where the pleats meet. That is why dough formula, thickness, and the final cook method should be chosen together, not one after another as separate afterthoughts.
Mixing, Kneading, and Resting for a Pliable Dough
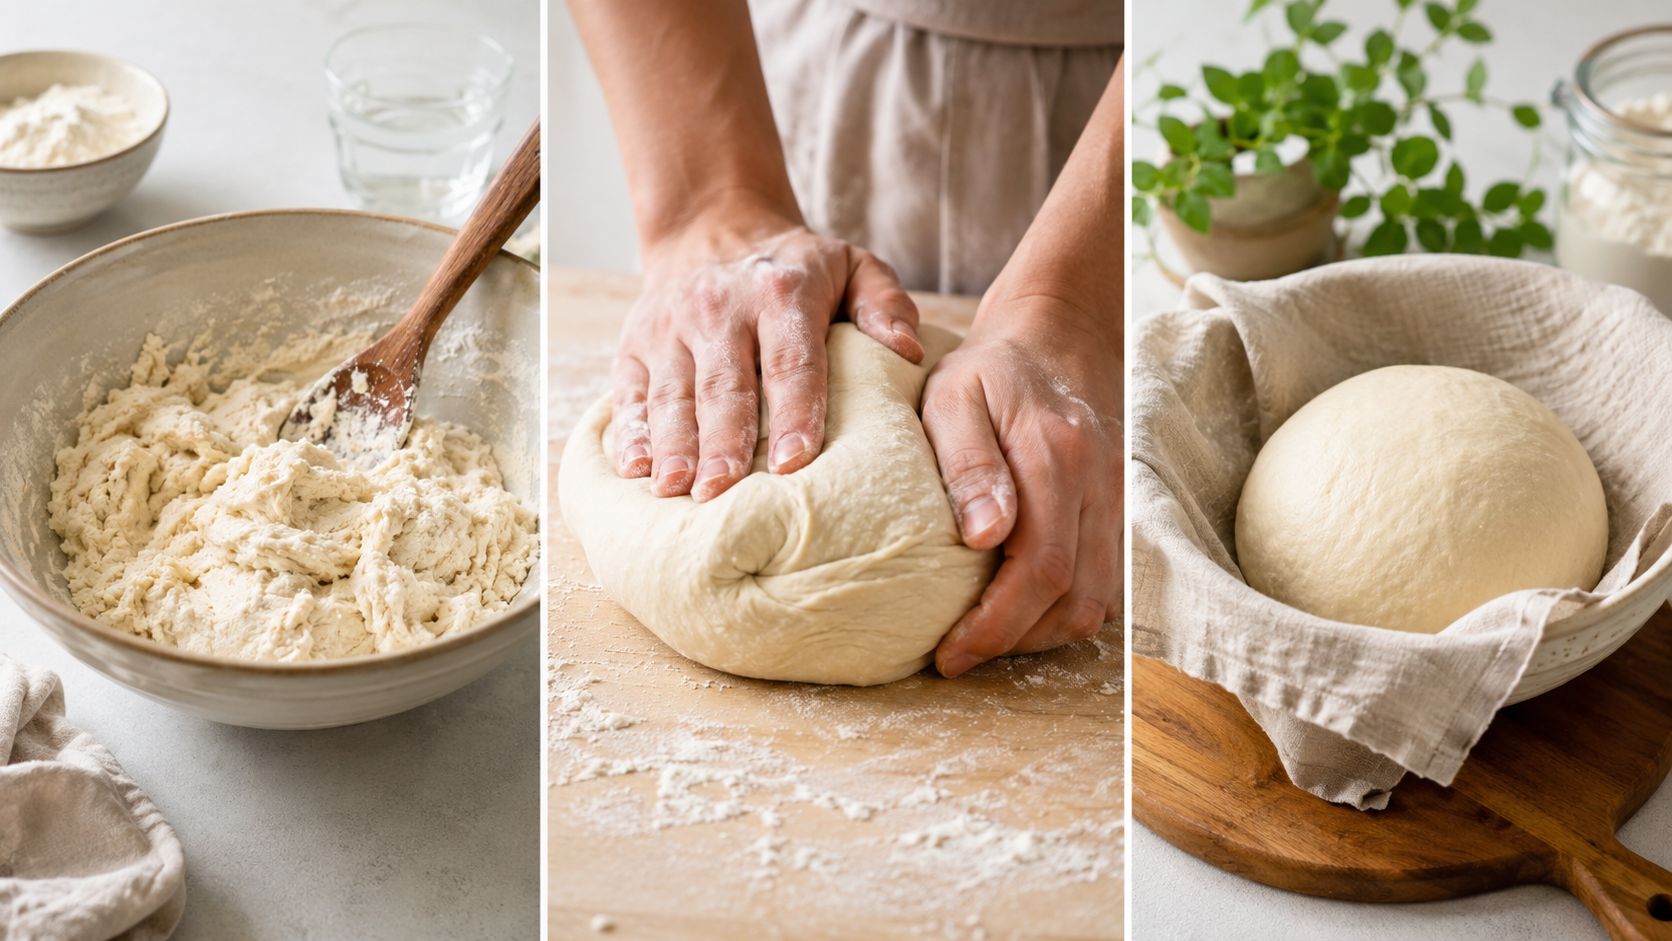
Mix flour and water until the dough looks shaggy first, not smooth. That rough stage matters because it tells you the flour has started absorbing liquid without being overworked. Once it comes together, knead until the surface feels smooth and the dough is slightly stiff, not sticky and not dry.
Kneading is about feel, not force
Many tested recipes fall in the 3 to 8 minute kneading range, while another common benchmark is about 10 to 12 minutes by hand or 12 minutes for a smoother dough Asian Cooking Mom, Korean Bapsang. That spread is normal because hydration and flour type change how fast the dough tightens. The goal isn't a timed ritual, it's a dough that feels elastic but not bouncy.
A properly kneaded dough should feel a little firm in the hand. It should hold together cleanly, with no dry flour streaks, and it should stop looking rough on the surface. If it starts fighting back every time you press it, it probably needs rest, not more flour.
Watch the dough, not the clock. If it looks smooth and feels slightly stiff, stop kneading and let it relax.
The rest period is where the dough becomes workable. Recipes commonly call for 30 minutes to 1 hour of resting, and some stretch that to 3 hours or overnight Korean Bapsang. That waiting time lets the gluten relax so the dough stops shrinking back as soon as you roll it.
Later, if you want a visual reference for the rhythm of the process, the video below is worth watching after the dough has had time to rest.
How rested dough should behave
When you press a finger into rested dough, it should keep the impression for a moment and then spring back only slightly. It shouldn't feel rubbery, and it shouldn't snap back so fast that you lose the shape you just made. That tiny pause is the sign the dough will roll without constant recoil.
Cover the dough during resting and between shaping steps. A dry surface is one of the fastest ways to ruin wrapper dough because the edges crack before you even reach the filling stage. For a cook who likes structured recipes, The Nordic Table makes the same case in a different cuisine, restraint and timing matter more than extra complexity.
Rolling and Cutting Wrappers to the Right Thickness
A rested dough log is easier to portion cleanly, so cut it before the surface dries out. In practice, I aim for 12-gram portions or pieces around 3/4 inch (2 cm) thick when I want a batch that rolls out evenly and stays easy to handle, which typically gives you about 20 wrappers from one dough Marion's Kitchen. Another workable method is to cut the log into about 10 pieces and roll each one to palm-size, roughly 3.5 to 4 inches across Asian Cooking Mom.
The center and edge need different treatment
Uniform thickness is the mistake that causes the most trouble later. A better wrapper keeps the center slightly thicker and the edge thinner. The center carries the filling, while the rim needs to fold, pleat, and seal without tearing.
That thickness change is not cosmetic, it affects how the dumpling cooks and how the seam behaves under heat. A thinner edge closes more cleanly, while the slightly heavier center gives the wrapper enough body to hold wet filling without splitting. If every part of the round is rolled to the same thinness, the seam is more likely to open in boiling water or soften too much during steaming.
Work one piece at a time and keep the rest covered. Once the dough skin dries, it loses flexibility fast, and the first place it shows is usually the fold line. A light dusting with flour, cornstarch, or potato starch helps the wrappers stack without sticking, which matters whether you are working by hand or using a machine.
For larger batches, a machine can save time and keep the thickness more consistent. If your hands start rolling unevenly after the first few rounds, it is easier to buy a 150mm pasta maker than to fight with wrappers that keep drifting from thin to thick. The tool does not replace judgment, but it does help when you need a steady sheet and you do not want the center to creep too thin.
A practical reference from Japanese home cooking recipes is useful here if you want to compare how wrapper style shifts across gyoza and softer steamed dishes. The differences are mostly about handling and finish, not a single perfect thickness for every dumpling.
A simple comparison helps while you roll:
-
Boiled dumplings: keep the wrapper sturdier so it can handle bubbling water and repeated lifting.
-
Pan-fried gyoza: roll a little thinner so the bottom crisps cleanly instead of staying doughy.
-
Steamed dumplings: stay on the thinner, softer side because steam is gentler than boiling.
If you want the wrapper to feel right in the mouth, the edge should fade into the bite and not announce itself. That means choosing thickness for the filling and the cooking method first, then adjusting the roll so the wrapper protects the dumpling without turning heavy.
Matching Wrapper Thickness to Cooking Method
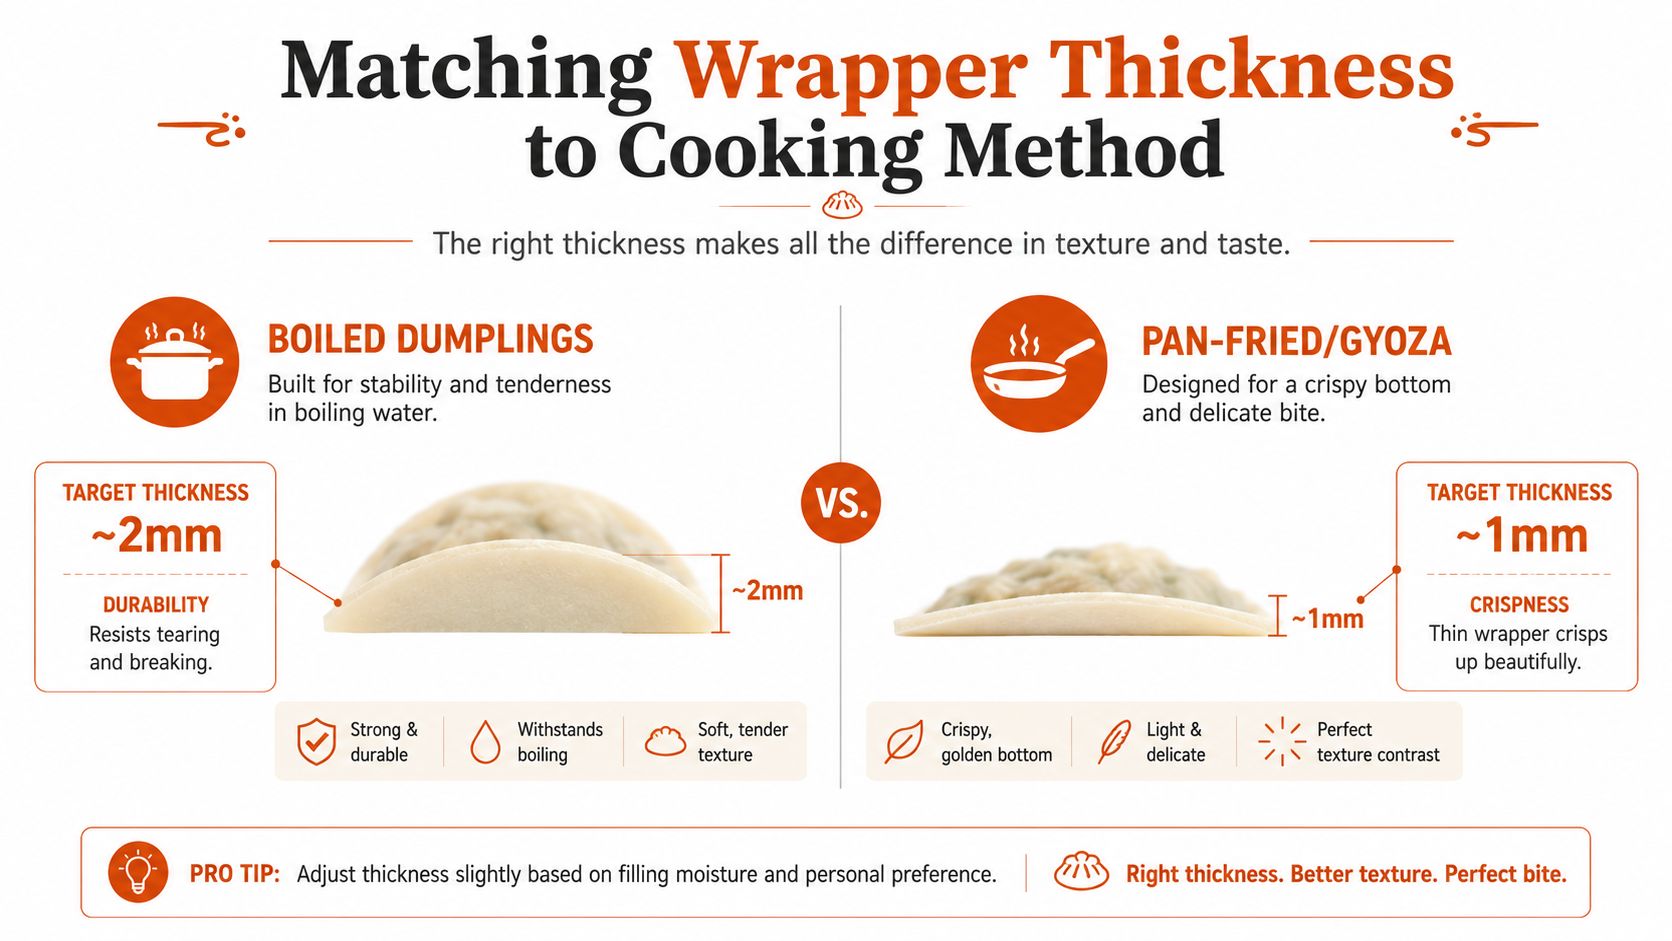
Thickness is a cooking decision, not just a shaping preference. A wrapper that feels perfect for steaming can fail in boiling water, and a heavier skin that protects a boiled dumpling can taste awkwardly thick when steamed. The right call depends on how much stress the wrapper has to survive.
Match the skin to the heat
For boiled dumplings, a thicker wrapper gives structural insurance. Around 2 mm is a practical target when the filling is juicy or the dumpling will sit in active water for long enough to test the seam. For pan-fried dumplings, the wrapper usually needs enough strength to hold shape, but not so much thickness that the bottom stays gummy instead of crisp.
Steamed dumplings are the most forgiving place to go thinner. Steam is gentler than boiling, so the wrapper can stay delicate while the filling stays protected. The center-thicker, edge-thinner roll pays off the most here, because the seal can stay strong without turning the whole dumpling heavy.
A good dumpling wrapper should disappear into the bite, not dominate it.
That doesn't mean thinner is always better. If the filling is wet, overstuffed, or aggressively seasoned, a too-thin skin can burst at the seam or split around the sides. If you're unsure, keep a little extra thickness near the fold line and go lighter on the rim.
The internal guide on Cantonese wonton soup is a useful comparison point because soup dumplings reward a different wrapper behavior than pan-fried ones. The wrapper choice always follows the cooking method, not the other way around.
Use a decision rule, not a guess
-
Boiling: choose durability first.
-
Pan-frying: choose a balance of strength and crisping.
-
Steaming: choose tenderness and clean sealing.
The same principle applies when you look at broader home-cooking references like Mexican Home Cooking, where tortilla thickness changes the dish even before the filling goes in. Dumpling wrappers work the same way, because the dough itself is part of the final texture.
Storing, Refrigerating, and Freezing Wrappers Properly
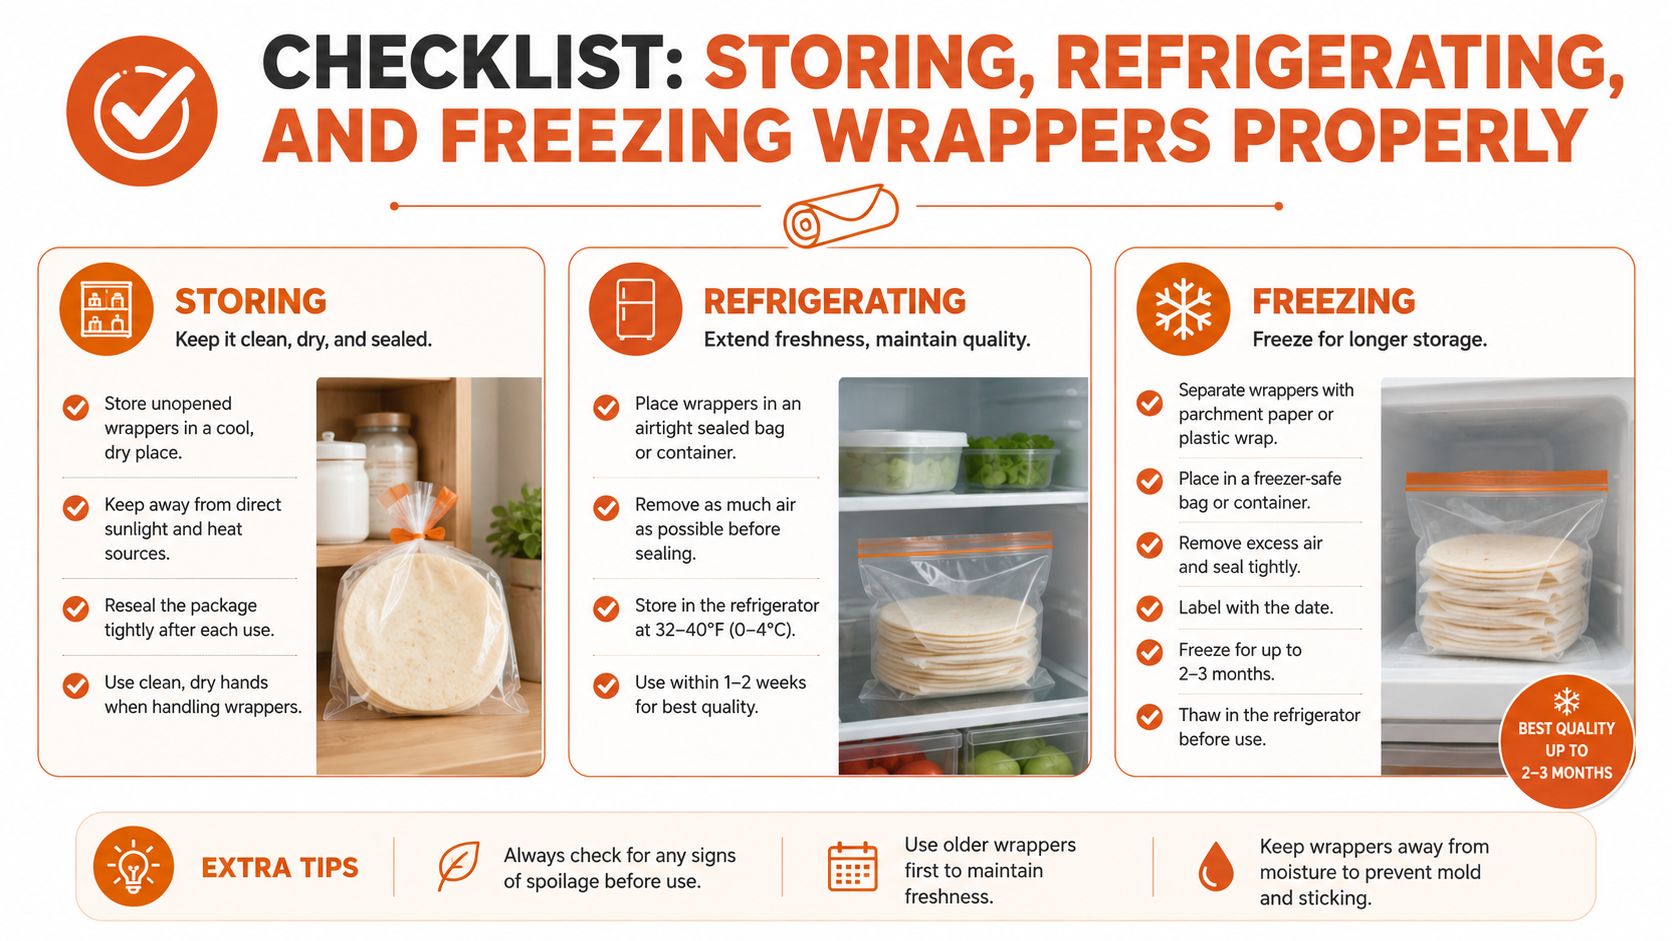
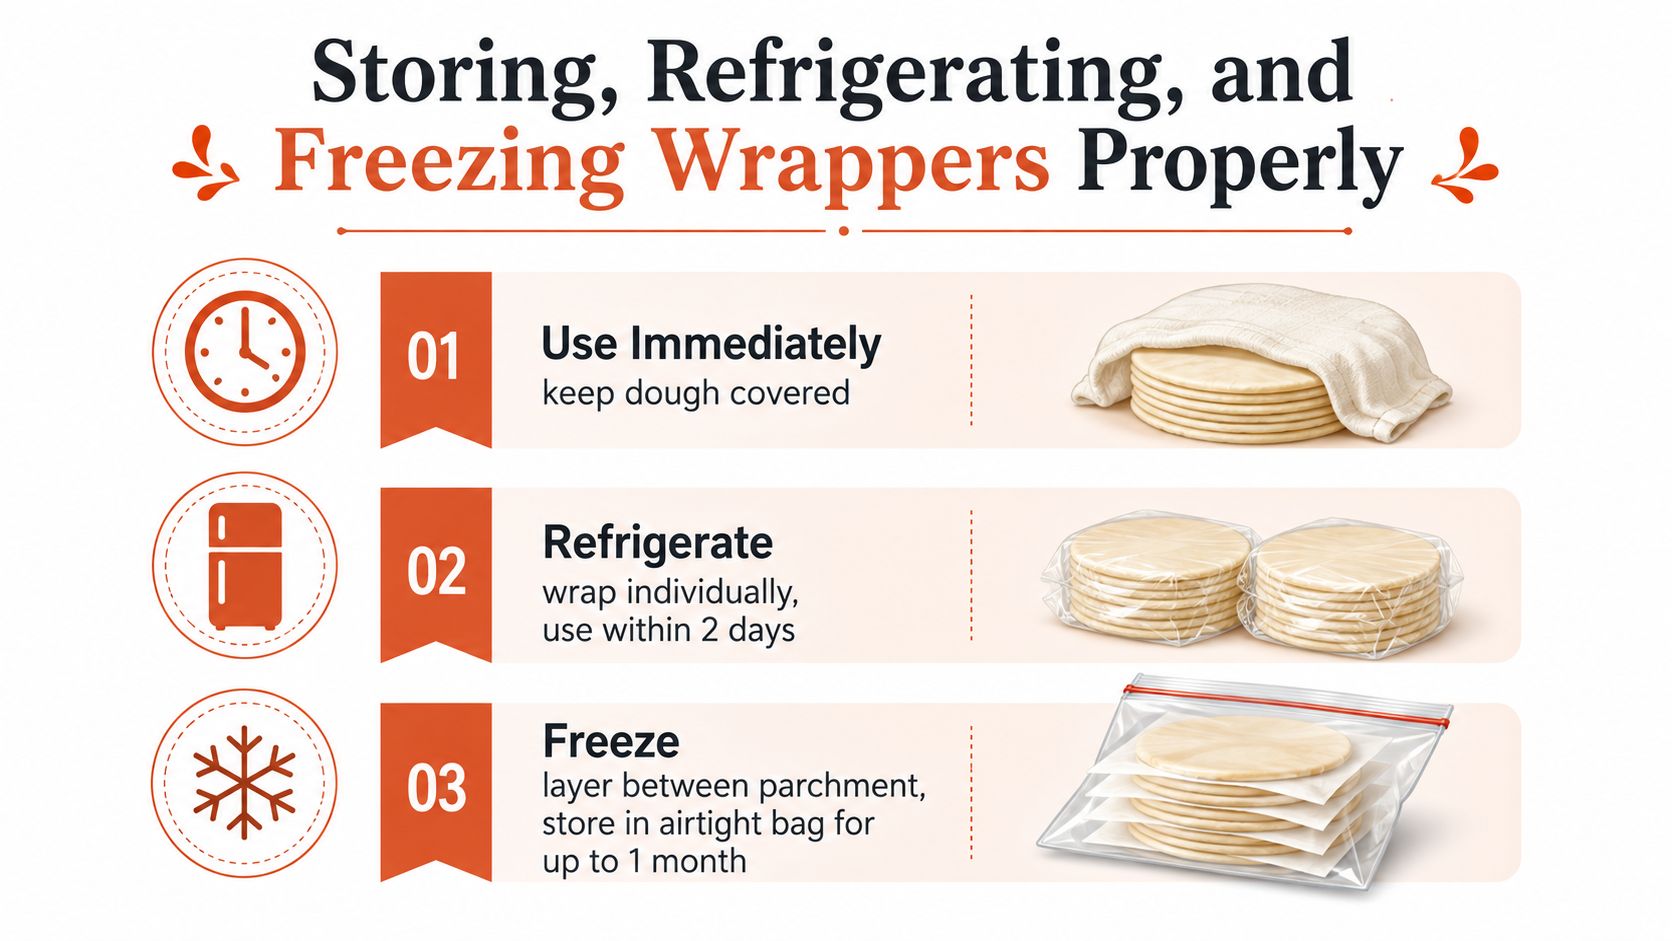
The make-ahead question is where most wrapper advice falls apart. Fresh wrappers behave well on the counter for a short window, but once they sit too long, the edges dry, the stacks fuse, or the dough loses stretch after thawing. Good storage is really three separate workflows.
Use them immediately when the dough is freshest
If you're folding right after rolling, keep the dough covered the entire time and work in small batches. That protects the edges from drying and keeps the wrappers pliable enough to pleat cleanly. It also makes the filling stage faster because you're not rescuing cracked skins one by one.
Refrigerate only when you need a short delay
Some recipes say wrappers can be refrigerated for up to 2 days when dusted with starch and sealed airtight Marion's Kitchen. That works if the wrappers are stacked lightly, dusted well, and protected from air. The failure point is usually moisture loss at the edges or pressure from too much weight in the stack.
Practical rule: the more delicate the wrapper, the shorter the fridge time should be.
If you're storing wrappers for a few hours, dust them with flour, cornstarch, or potato starch and keep them wrapped tightly. If the stack is heavy or the dusting is sparse, the skins can fuse together and tear when you separate them.
Freeze for real make-ahead planning
Freezing is the better answer when dinner is days away. Lay flour-dusted wrappers in layers with parchment or starch between them, then pack them airtight. One source notes freezing uncooked dumplings for up to 1 month in a freezer-safe bag or container Omnivore's Cookbook. For wrappers alone, the same logic applies, because air exposure is what ruins the surface first.
Thaw in the fridge, not on the counter, then bring them back toward room temperature before filling. Counter-thawing softens the outside unevenly and makes cracking more likely when you lift or pleat the skins. If your plan is loose and your timeline is wide open, the internal freezer meal cookbook can also help you think through when to freeze wrappers versus fully formed dumplings.
Troubleshooting the Three Most Common Wrapper Problems
Spring-back during rolling almost always means the dough hasn't rested long enough. The fix isn't more flour, it's more time under cover. If the dough keeps shrinking, stop rolling and let it relax for another stretch.
Tearing at the edges usually comes from drying, overworking, or both. A dry rim cracks when you try to pleat it, while overworked dough loses the smooth, pliable feel that makes sealing easy. Keep the unused dough covered, and if the surface already feels tight, rest it again before rolling more.
If the wrapper fights back, it usually wants rest, not rescue flour.
Stacked wrappers fusing together are a dusting problem. Use enough flour, cornstarch, or potato starch between layers, and don't pile the stack so high that its own weight compresses the skins. If they've already started sticking, separate them gently before they fully bond.
The less obvious issue is tough cooked wrappers. That usually traces back to over-kneading or dough that was too dry or too wet from the start, not the steamer or pot. When the dough is balanced and rested, the wrapper stays supple after cooking instead of turning chewy in a bad way.
If you want more kitchen-tested dumpling technique, storage guidance, and dependable everyday recipes, browse Just Cook It. It's a practical place to find clear, tested instructions when you're ready to make another batch, whether you're folding wrappers tonight or planning ahead for the freezer.