When baked potatoes are on the menu, reaching for aluminum foil can seem like the natural first step. Yet wrapping them traps moisture around the potatoes, leaving the skins softer than many people prefer. For crisp, well-seasoned skin and a light, fluffy interior, skip the foil altogether. Start with thoroughly dried potatoes, expose them directly to the oven’s heat, and check their internal temperature for doneness instead of relying only on baking time.
For medium russets, start with an uncovered bake around 425°F and begin checking after roughly 45 to 60 minutes. The potato is ready when the thickest part of the center reaches 205°F to 210°F, a finish range supported by standard baked-potato guidance and practical oven-testing advice from Savory Experiments.
Table of Contents
- Why Baking a Potato Without Foil Is the Modern Standard
- Prepping the Potato for a Crisp Skin
- The Oven Method on a Rack or Sheet Pan
- Alternative Methods Compared Side by Side
- Common Problems and How to Fix Them
- Topping Ideas That Match a Fluffy Interior
- Your Quick Decision Rule Before You Bake
Why Baking a Potato Without Foil Is the Modern Standard
Dinner is close, the potatoes are ready, and foil seems like the safer choice. On a standard oven, it usually gives you a soft jacket instead of the crisp skin and fluffy center a russet can deliver. Leaving the potato uncovered lets dry heat remove surface moisture, brown the skin, and build that crackly texture.
Foil is not the fix for a disappointing bake. A wet potato, crowded pan, uneven sizes, or a center that has not finished cooking can all cause trouble. Without a wrapper, those variables are easier to see and control, and the potato's skin has direct contact with circulating oven heat.
Practical rule: If crisp skin matters, leave the potato uncovered.
The basic setup is straightforward: russet potatoes, a light coating of oil, salt, and a hot oven. Choose a rack when you want air to reach every side and can accept a little dripping. Use a sheet pan when you want easier cleanup or are baking smaller potatoes that may finish quickly. An air fryer makes sense for one or two smaller potatoes when time matters more than batch size.
Size should guide the choice. Large potatoes need more time and benefit from the steady heat of an oven, while smaller ones suit the air fryer's faster circulation. The finish test that makes any of these methods repeatable is covered in detail in the oven method below.
Fork tenderness can mislead you. It may pass through a softened outer layer while the middle remains gummy, whereas an instant-read thermometer checks the interior directly. Use the temperature test as the final decision, then split the potato promptly so steam can escape.
Unwrapped baking also removes foil handling from the process. For a batch, that means less wrapping and unwrapping, plus fewer soft skins to rescue.
Prepping the Potato for a Crisp Skin
Choose russets that are close in size so they finish together. Medium potatoes under 16 ounces are commonly baked at 425°F for about 50 minutes, while extra-large potatoes over 16 ounces may need up to 1.5 hours at 400°F, according to recipe-testing guidance from Feasting at Home. You don't need perfect uniformity, but a tray of similarly sized potatoes is much easier to manage.
Scrub each potato under running water, then dry it thoroughly with a clean towel. Residual water has to evaporate before the skin can brown, so a damp potato tends to steam on the surface instead of crisping. Once dry, pierce the skin repeatedly with a fork to provide paths for steam to escape.
Rub the skin with a thin film of neutral oil. Grapeseed or avocado oil works well at high oven heat. Olive oil adds flavor, but it can burn more readily at the hotter end of the baking range, and butter can scorch before the potato is finished. Sprinkle coarse or kosher salt while the oil is still wet so the crystals adhere instead of falling onto the pan.
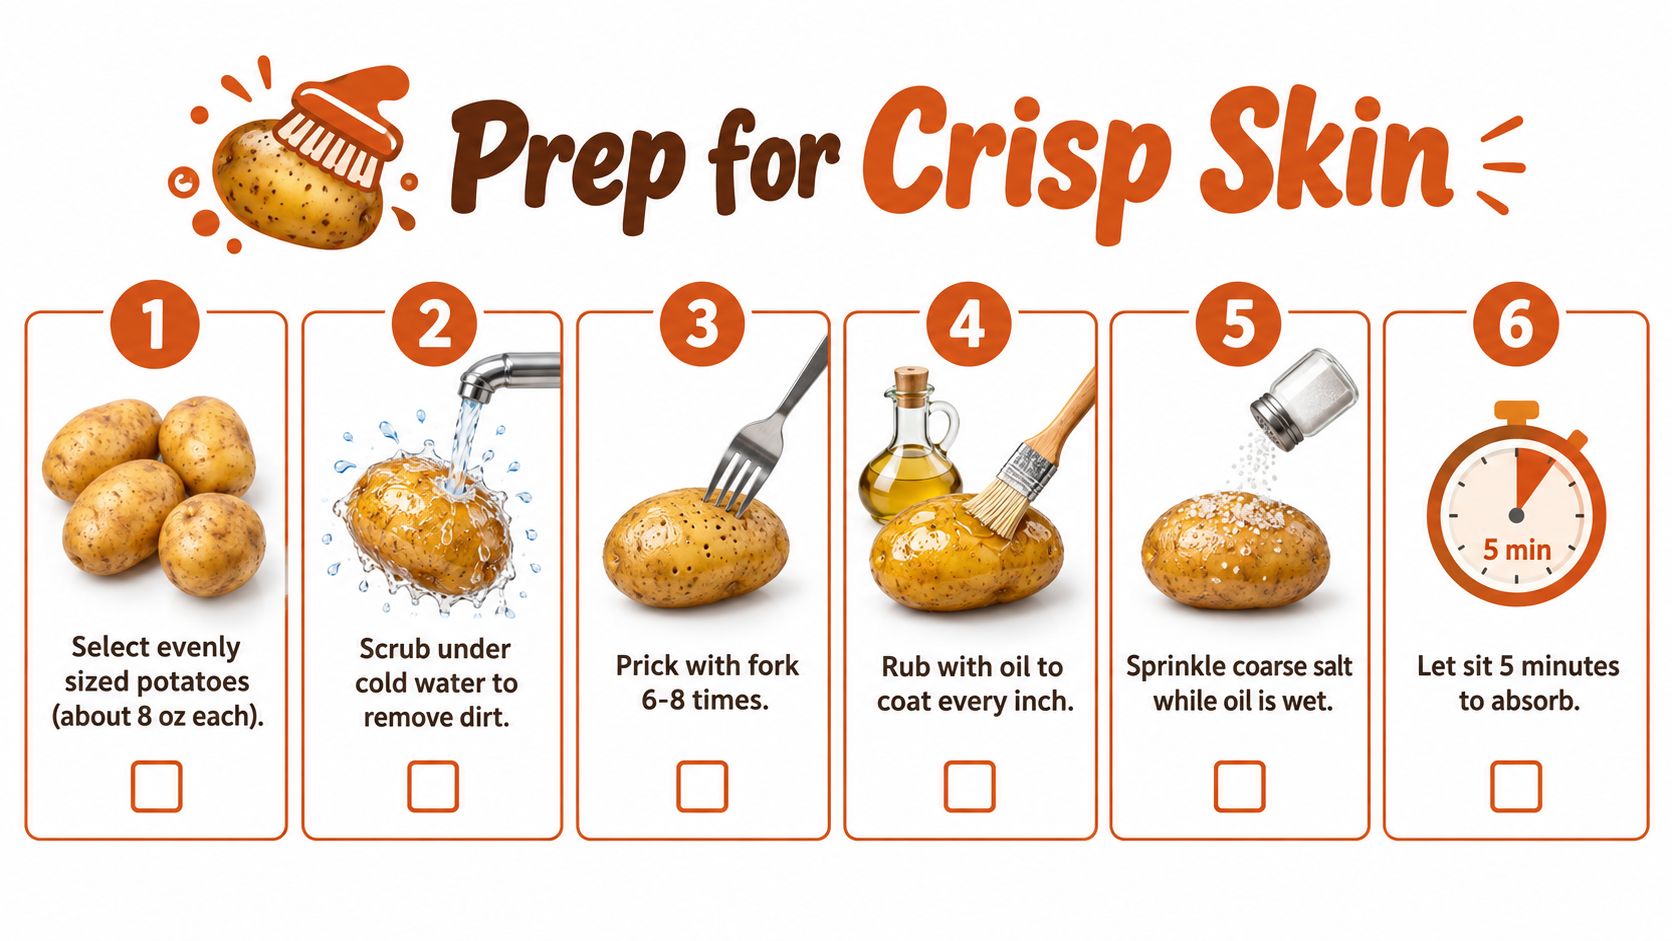
A simple preparation checklist
- Select evenly sized potatoes: Similar mass means more consistent cooking.
- Scrub and dry: Clean skin is useful, but completely dry skin is what browns.
- Pierce the surface: Make repeated fork holes around the potato, not just on one side.
- Oil lightly: A thin coating encourages browning without making the jacket greasy.
- Salt before baking: Salt sticks best while the oil remains tacky.
If you enjoy building meals around potatoes, bread, stews, and shared dishes, The Balkan Kitchen | Digital PDF includes recipes such as skordalia, a Greek garlic and potato dip, alongside Balkan mains, breads, soups, salads, and sauces.
For a visual walkthrough of the preparation sequence, use the embedded demonstration below.
The Oven Method on a Rack or Sheet Pan
Set the oven to 425°F for medium russets. Choose the setup based on potato size, batch size, and available time. Use a wire rack for one or two potatoes when you have at least an hour and want the crispest skin on every side. Use a rimmed sheet pan for four or more potatoes, or whenever keeping food off the oven rack matters more than maximum bottom crispness. The sheet pan gives you capacity, but its metal surface blocks airflow beneath the potatoes.
Place rack-baked potatoes directly on the center oven rack, leaving space between them. Slide a rimmed pan onto a lower rack if you need to catch stray oil or salt. For a sheet-pan batch, arrange the potatoes with room around each one and rotate them halfway through. Crowding traps moisture and slows browning.
Judge doneness with an instant-read thermometer, not a fork. Insert the probe into the thickest part and aim for the center. Pull the potato at 205°F for a classic fluffy texture. Let it reach 210°F for a drier, more bakery-style crumb, but avoid going much beyond that point because the flesh can become mealy. This temperature-based approach is also emphasized by Savory Experiments' oven method.
Rack-baked potatoes usually finish sooner because hot air reaches the bottom as well as the top and sides. Sheet-pan potatoes may need more time, especially when the pan is full, but the arrangement is easier to load and unload. If time is limited and you are cooking only one or two medium potatoes, an air fryer is the more practical choice. For large potatoes or a larger batch, use the oven and choose the rack unless capacity requires a sheet pan.
Timing guide
| Potato Size | Setup | Temp | Time | Pull Temp |
|---|---|---|---|---|
| Medium | Wire rack | 425°F | 50 to 60 minutes | 205°F to 210°F |
| Medium | Bare sheet pan | 425°F | About 60 to 75 minutes | 205°F to 210°F |
| Large | Wire rack | 400°F to 425°F | About 65 to 90 minutes | 205°F to 210°F |
| Large | Bare sheet pan | 400°F to 425°F | Longer than rack method | 205°F to 210°F |
Treat the clock as a reminder to check, since oven calibration and potato density vary. For more everyday baking ideas, see easy baking recipes.
Rest the potato for about five minutes after it reaches the target temperature. Cut a cross through the top, squeeze the ends gently to open the center, and add toppings while the flesh is hot.
Alternative Methods Compared Side by Side
The rack method gives the most balanced crispness, but it isn't the only useful way to bake without foil. A rimmed sheet pan handles a larger batch, a salt crust makes the skin especially striking, and a microwave start shortens the oven stage when time is tight.
A microwave-assisted potato still needs a crisping finish. Start the pierced potato in the microwave for about five minutes, then transfer it to a hot oven or air fryer so the outside can dry and brown. This is faster, but the skin usually won't develop quite the same depth as a potato cooked entirely in dry oven heat.
An air fryer works well for one or two medium potatoes. Current guidance commonly places air-fryer cooking in a 40 to 60 minute range, with some methods using internal targets between 190°F and 200°F. For the fluffiest, most dependable finish, continue checking until the center is in the broader 205°F to 210°F range used for oven baking. The Air Fryer Everyday Cookbook Digital PDF is a relevant resource if this appliance is part of your regular cooking routine.
| Method | Best Potato Size | Total Time | Skin Texture | Best For |
|---|---|---|---|---|
| Direct oven rack | Medium to large | About 45 to 90 minutes | Crisp all around | Maximum skin texture |
| Rimmed sheet pan | Several medium potatoes | About 60 minutes or longer | Crisp top, softer contact side | Larger batches |
| Coarse salt crust | Medium potatoes | Similar to oven bake | Firm, heavily seasoned skin | Presentation |
| Microwave start, then crisp | Medium to large | Around 30 minutes total | Good, but less developed | A rushed dinner |
| Air fryer at 400°F | One or two medium potatoes | About 40 to 60 minutes | Crisp and concentrated | Less oven heat |
The salt crust is more of a presentation choice than a speed technique. Press coarse salt onto the oiled skin, bake uncovered, and brush away excess after cooking. It creates a dramatic shell, but the salt can make the potato intensely seasoned and leaves more cleanup.
Choose the rack for a large russet when all-around crispness matters. Choose the sheet pan for a group. Use the salt crust when appearance matters, the microwave start when dinner has to move quickly, and the air fryer for one or two medium potatoes. For cooks developing their own collections, how to format a cookbook in Pages offers practical layout guidance. Whichever route you choose, use the internal temperature as the final decision.
Common Problems and How to Fix Them
Soft skin usually has a simple cause. The potato may still be damp, the oil may not cover the surface evenly, or the oven may be running cooler than its display suggests. Dry the potato completely, apply a thin coating of neutral oil, and check the oven with a separate thermometer if the result stays leathery.
A raw or gummy center usually means the potato was too large for the time allowed, or the oven door was opened repeatedly. Use the thermometer in the thickest center section and leave the oven closed during the early part of cooking. A fork can confirm tenderness after the temperature is close, but it shouldn't replace the temperature check.
A burst potato points to trapped steam. Skipping the piercings is the obvious cause, but a very cold potato can also heat unevenly. Let a refrigerated potato sit at room temperature for about 20 minutes, then pierce the skin in 6 to 8 places before oiling, following the practical troubleshooting approach from The Happier Homemaker.
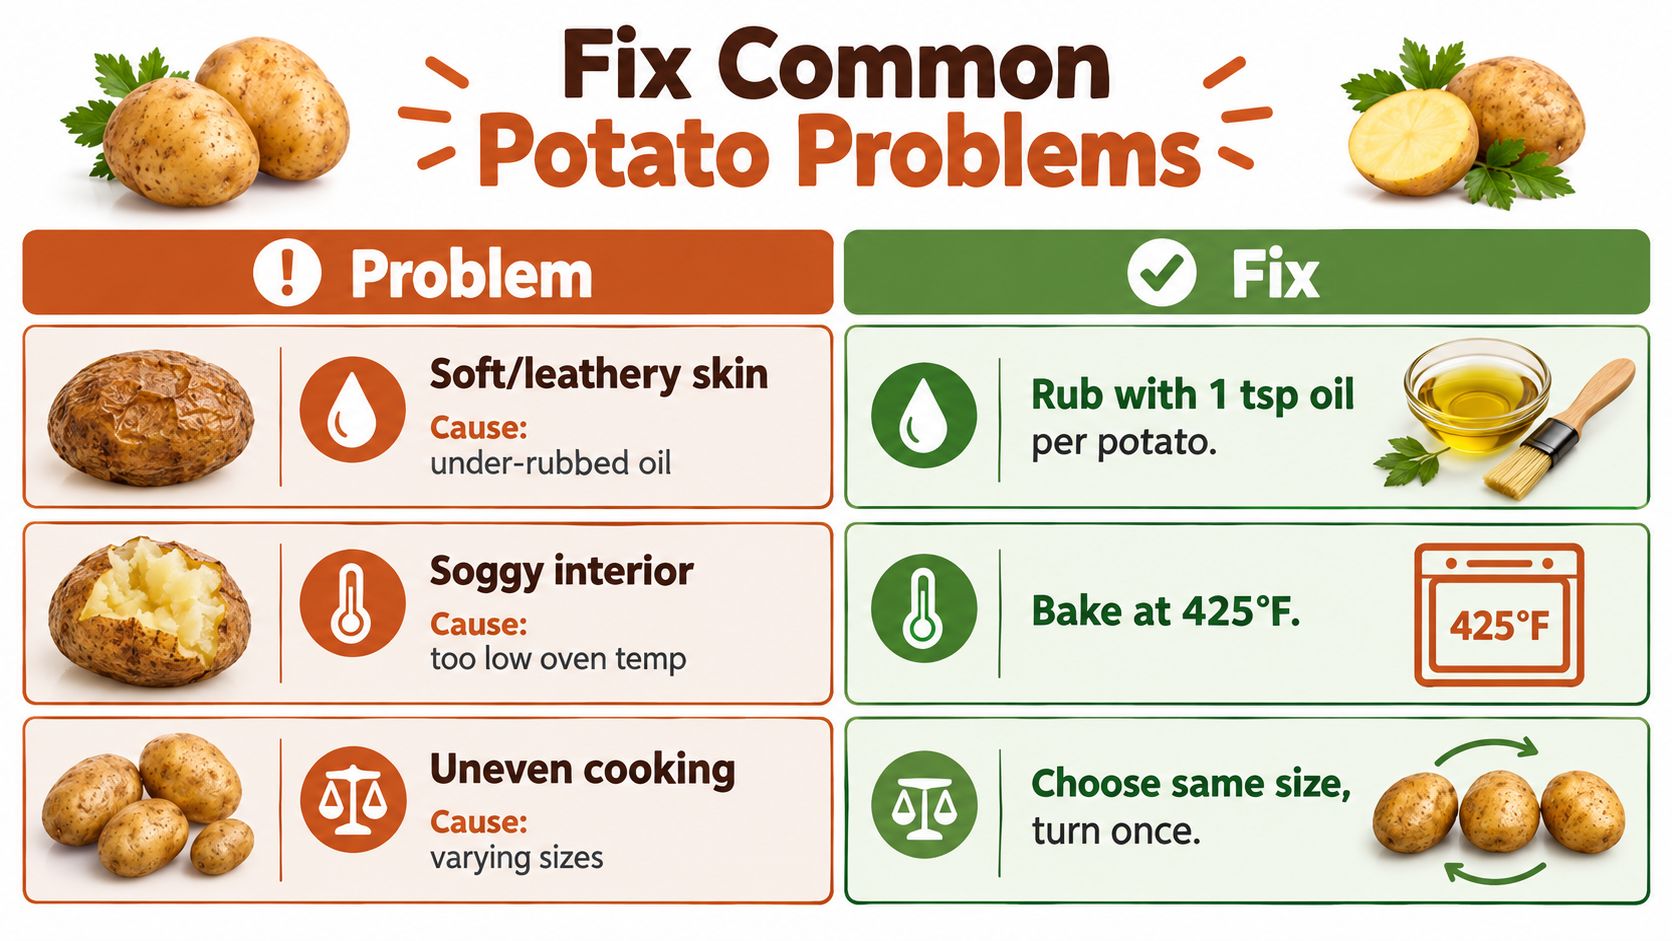
The prevention habits that matter most
- For leathery skin, dry first: Moisture on the surface delays browning.
- For a gummy center, measure the middle: The thermometer is more reliable than elapsed time.
- For a burst jacket, pierce every potato: Steam needs an escape route.
The most useful habit is to treat potato size as a cooking variable, not a detail. A small russet and a thick, heavy russet won't finish together because they entered the oven at the same time.
Topping Ideas That Match a Fluffy Interior
Start with toppings that let the potato taste like itself. A warm pat of cultured butter, flaky salt, and cracked black pepper melts into the open crumb without hiding the roasted flavor of the russet.
For a sharper contrast, use sour cream and chives, Greek yogurt with lemon zest and dill, or crème fraîche with capers. Each pairing adds moisture and acidity, which balance the dry, fluffy interior, but add them only after slicing so the skin stays crisp.
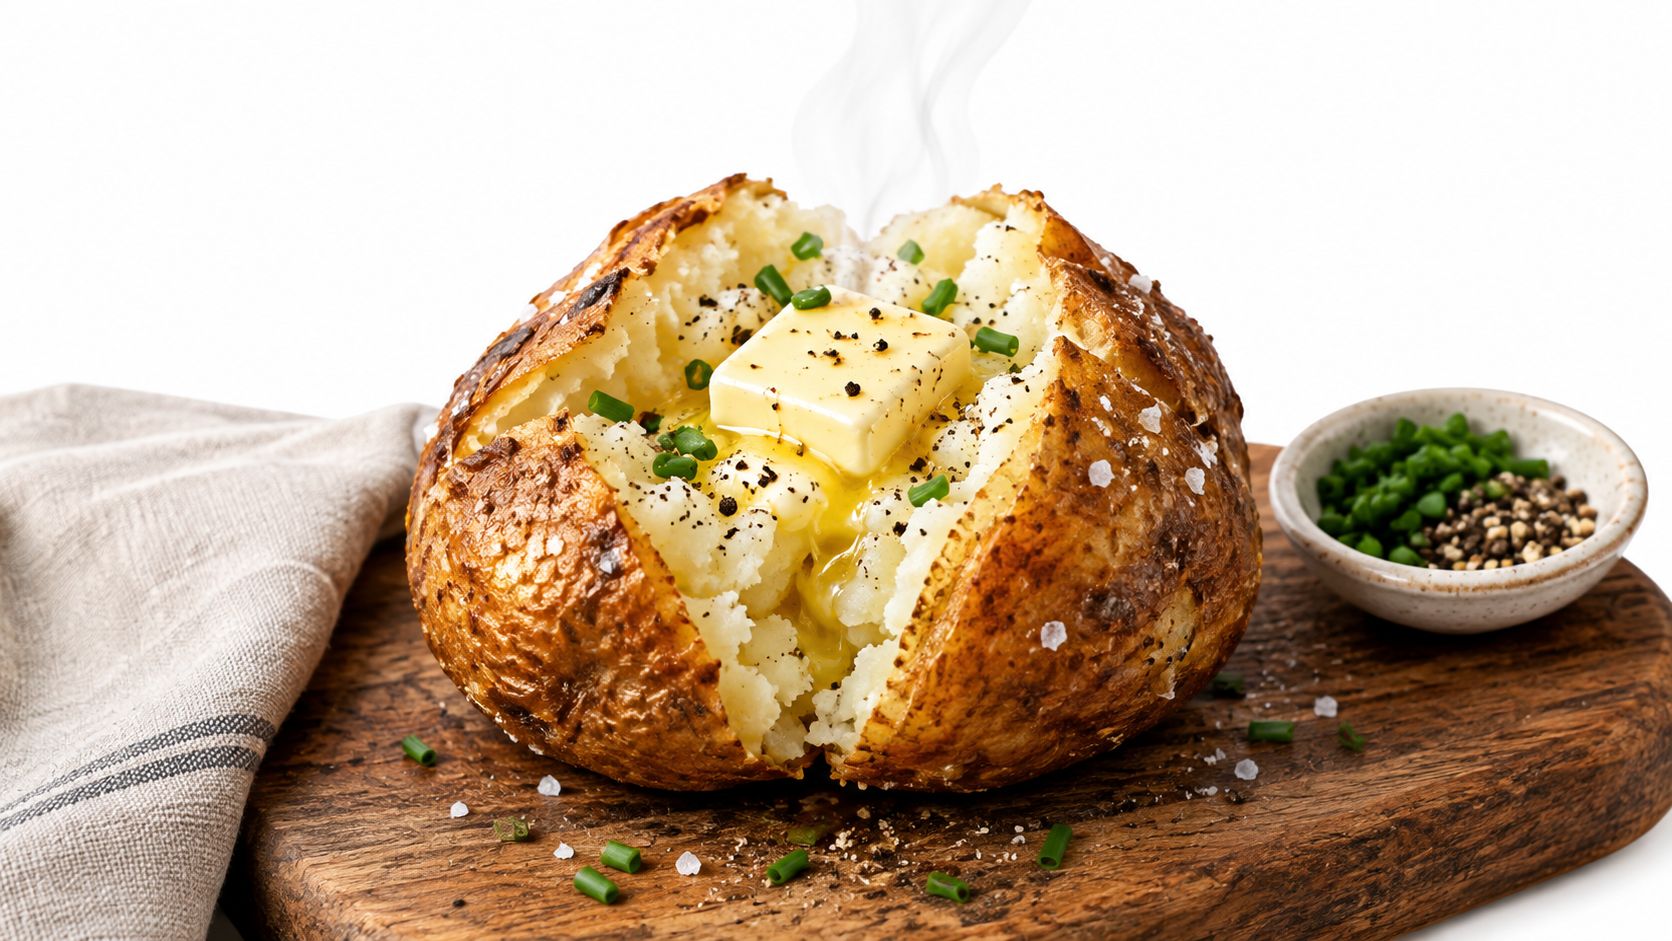
For a fuller meal, add shredded sharp cheddar during the final couple of minutes so it melts without burning. Chili works especially well after the potato is split, because the crisp shell provides structure for a wet topping. Miso butter with toasted sesame is a strong sweet-savory option for a russet cooked toward the 210°F end of the finish range.
The same balance works in other everyday ingredients. If you're adding avocado-based sides or sauces, this guide to using avocados can help you pair their richness with brighter flavors.
Keep wet toppings separate until serving. Spoon them into the split potato at the table, rather than letting them sit on the skin while the potato rests.
Your Quick Decision Rule Before You Bake
The baseline is short enough to remember: dry skin, a light coating of oil or salt, uncovered heat, and a center temperature of 205°F to 210°F. Use the appliance and setup that match the potato's size and the time available.
- Small potato under 6 ounces: Use an air fryer at 400°F for roughly 35 to 40 minutes, then check the center.
- Medium potato from 6 to 10 ounces: Use a center-oven rack at 425°F for an even bake and crisp skin.
- Large potato over 10 ounces: Use a sheet pan for stability, and consider a 15-minute microwave start before crisping it in the oven.
- Several potatoes at once: Use a rimmed sheet pan when you need capacity. Choose a salt crust when the seasoned presentation is part of the plan.
These size bands are useful as a decision aid, but they aren't a guarantee. Potato shape, density, spacing, and appliance performance all affect the finish, which is why current guidance spans roughly 40 to 80 minutes across oven methods and commonly gives air-fryer ranges around 40 to 60 minutes. The clock tells you when to inspect the potato. The thermometer tells you when to remove it.
Pierce the skin before cooking, and measure the thickest part of the center before serving. A fork should slide in easily, but it shouldn't be the only evidence that the middle is done.
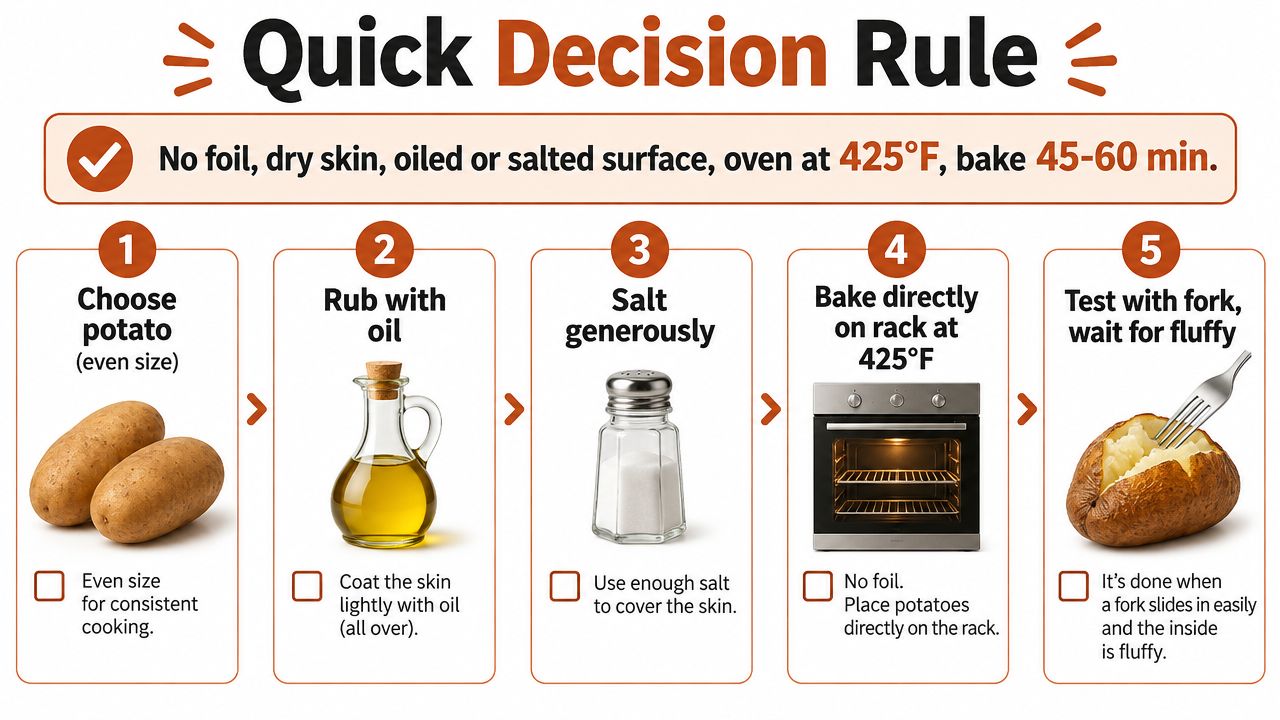
Save this rule: dry it, pierce it, bake it uncovered, and pull it when the center reads 205°F to 210°F.
Just Cook It offers downloadable digital cookbooks with clear, kitchen-tested recipes for everyday cooking, including collections that work well alongside a dependable baked potato. Visit Just Cook It to browse recipes you can read on a phone, tablet, laptop, or e-reader.